

Hey there! Remember that drawer in your kitchen—you know the one. The place where pens, batteries, rubber bands, and mystery keys all go to die together? Yeah, mine was a disaster too.
Every time I needed scissors or tape, I'd have to dig through layers of junk. Half the time I'd give up and just buy new batteries because finding the old ones felt impossible. Mike would toss stuff in there, the kids would add their "treasures," and before I knew it, I couldn't even close the drawer all the way.
Here's the Thing About Junk Drawers
They're actually really important! This is where we keep all those everyday essentials—the things we reach for constantly. When that drawer is chaos, it slows down everything. I was wasting probably 5-10 minutes a day just searching for basic stuff.
But I also knew I couldn't spend a fortune organizing it. This is a junk drawer, not a Pinterest showpiece. So I set myself a budget: under $20, using products that would actually hold up to real family use.
What I Bought (Total: $16.43)
Here's exactly what I ordered from Amazon:
Lifewit 5-Pack Adjustable Drawer Dividers - $9.99
These are the spring-loaded dividers that create sections in your drawer. They adjust from 11" to 17", so they fit standard kitchen drawers perfectly. I used three of them to create four sections—one for batteries and small items, one for pens and markers, one for scissors and tape, and one for miscellaneous stuff like rubber bands and twist ties.
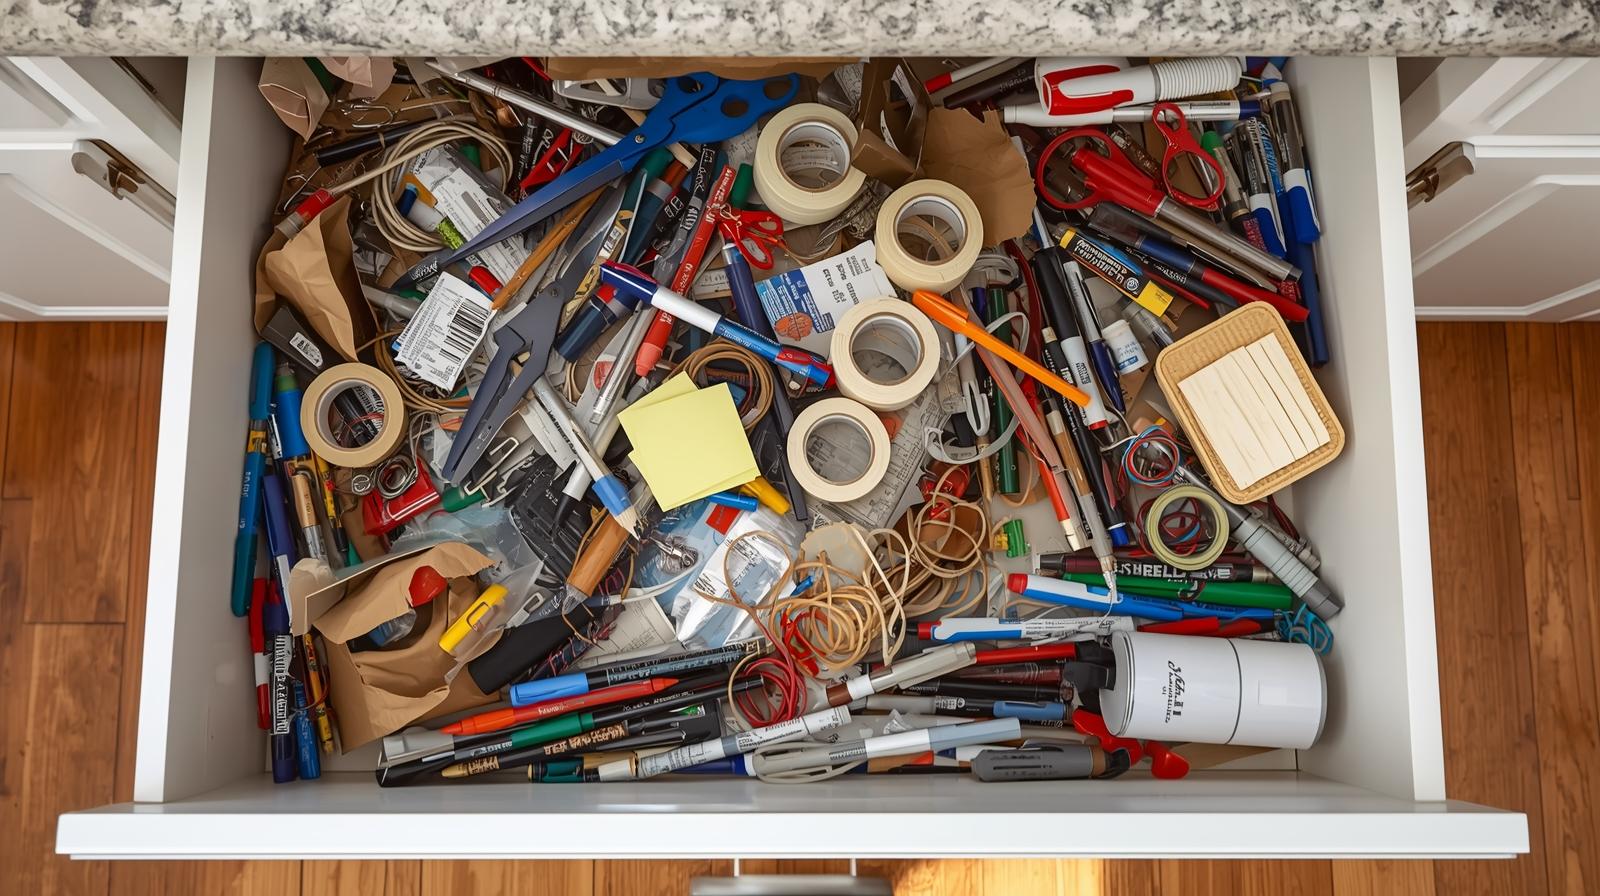
This was my drawer before. Real talk: I think there were three rolls of tape in there, and I could never find any of them.
SMARTAKE 13-Piece Clear Drawer Organizer Set - $6.44
These small clear trays are perfect for tiny items that would otherwise get lost. I use the small square ones (3" x 3") for batteries, and the rectangular ones for paper clips and rubber bands. They have non-slip pads on the bottom, which actually works—they don't slide around when I open the drawer.

The spring-loaded dividers and small organizer trays before I installed them. Nothing fancy, but they do the job.
How I Set It Up (15 Minutes, Seriously)
I'm not going to lie and say this was some elaborate process. It took about 15 minutes, and that includes the 5 minutes I spent finding a place for all the random stuff I didn't need.
Step 1: Empty everything out onto the counter. I found: 4 rolls of tape (seriously), 3 pairs of scissors, about 20 pens (half didn't work), random batteries, rubber bands, a broken phone charger, and take-out menus from restaurants that closed years ago.
Step 2: Throw away the obvious garbage. Non-working pens, old menus, that mystery key I've been keeping for literally no reason. This freed up so much space.
Step 3: Install the spring-loaded dividers. You just press the button, adjust them to the right length, and let them spring into place against the drawer sides. They hold tight—I've opened this drawer about a thousand times in 8 months and they've never budged.
Step 4: Place the small trays in the sections. I put the square ones in the section closest to the front (for batteries—these are what I grab most often), and the rectangular ones toward the back.

The small SMARTAKE trays work perfectly for batteries, rubber bands, and other tiny items that used to just roll around loose.
Step 5: Put everything back in its designated spot. Pens in one section, tape and scissors in another, batteries in the small trays, miscellaneous stuff in the back section.
Total time: 15 minutes. Total cost: $16.43.
What I Learned After 8 Months
Real talk: I didn't think this would last. I figured within a month it would be back to chaos. But here's what actually happened:
It's still organized. Like, actually organized. Emma knows where to find scissors for her art projects. Mike stops tossing random stuff in there because there's now a clear system. Even Lucas (who's 5) knows where the tape goes.
The spring-loaded dividers are sturdy. I was worried they'd slip or break, but they're solid. They've held up through 8 months of daily use, and they still feel as tight as the day I installed them.
The clear trays are key. Being able to see exactly what's in each tray means I actually know when I'm running low on batteries or when there are too many pens piling up. No more buying duplicates of things I already have.
The system needs occasional maintenance. About once a month, I spend 2 minutes pulling out things that don't belong and putting them where they go. That's it. Two minutes to maintain 8 months of organization.
What Doesn't Work (Being Honest)
The system isn't perfect. Here's what I've learned:
- It only works if everyone knows the system. I had to show Mike and the kids where things go. Now they know, and it's fine. But the first week, things ended up in random spots.
- You need to be realistic about what goes in there. I tried to keep instruction manuals in one section, but they're too big and made everything cramped. Now manuals go in a different spot, and the drawer is just for everyday small items.
- Some items don't fit well. My kitchen shears are too big for the sections I created. They still live in the drawer, but they lay flat along one side. Not perfect, but it works.
Would I Do It Again?
Absolutely. In fact, I've bought more of these organizer trays for other drawers. They're sitting in my bathroom drawer now, holding hair ties and bobby pins.
For $16.43 and 15 minutes of time, I completely transformed one of the most-used spots in my kitchen. No more digging, no more frustration, no more buying duplicate scissors because I can't find the ones I already have.
If You're Going to Try This
Here's my advice:
Measure your drawer first. The dividers I used adjust from 11-17 inches. If your drawer is deeper than that, you'll need different dividers or you'll need to place them front-to-back instead of side-to-side.
Start with what you have. Before you buy anything, empty your drawer and see what you actually need to store. I almost bought too many trays because I thought I had more stuff than I did.
Don't overthink it. This isn't about creating an Instagram-perfect drawer. It's about being able to find what you need quickly. If your system is a little messy but functional, that's better than a beautiful system that's too complicated to maintain.
Consider your family's habits. Mike tosses things without looking. So I made the "miscellaneous" section extra big to catch his random stuff. Work with your family's habits, not against them.
The Bottom Line
Your kitchen junk drawer doesn't have to be perfect. It just needs to work.
For $16.43, I turned a source of daily frustration into something actually functional. It's held up for 8 months with a family of four using it constantly. And honestly? That feels like a pretty good investment.
Let's make your home a haven for less!